Difference between revisions of "5inch HDMI Display"
(→Driver download) |
|||
| (116 intermediate revisions by 3 users not shown) | |||
| Line 6: | Line 6: | ||
}} | }} | ||
| − | + | == <font color="blue">Product Video</font> == | |
| − | + | {{#ev:youtube|uajKsf9Wjig}} | |
| − | == <font color="blue"> | ||
| − | |||
| − | |||
| − | + | *[http://www.lcdwiki.com/Video_Presentation Related Video] | |
| − | + | == <font color="blue">Product pictures</font>== | |
| − | + | [[File:MPI5008-66.png|650px]]<br /> | |
| − | + | [[File:MPI5008-001.jpg|215px]][[File:MPI5008-002.jpg|215px]][[File:MPI5008-003.jpg|215px]] | |
| − | |||
| − | |||
| − | |||
| − | |||
| − | == <font color="blue"> | + | == <font color="blue">Product description</font>== |
| − | * | + | *5inch standard display, 800 × 480 resolution |
| − | * | + | *With resistive touch screen, support touch control |
| − | * | + | *support backlight control alone, the backlight can be turned off to save power |
| − | * | + | *supports standard HDMI interface input, compatible with and can be directly inserted with Raspberry Pi (3rd, 2nd, and 1st generation) |
| − | * | + | *can be used as general-purpose-use HDMI monitor, for example: connect with a computer HDMI as the sub-display (resolution need to be able to force output for 800 x480) |
| − | * | + | *used as a raspberry pie display that supports Raspbian, Ubuntu, kali, Kodi(no touch), win10 IOT(no touch) |
| + | *work as a PC monitor, support XP,win7, win8, win10 system(do not support touch) | ||
| + | *CE, RoHS certification | ||
| − | == <font color="blue"> | + | == <font color="blue">Product Parameters</font> == |
| − | |||
| − | |||
| − | |||
| − | |||
| − | |||
| − | |||
| + | *Size: 5.0(inch) | ||
| + | *SKU: MPI5008 | ||
| + | *Resolution: 800*480(dots) | ||
| + | *Touch: 4-wire resistive touch | ||
| + | *Product Size: 121.11*77.93(mm) | ||
| + | *Package Size: 154*135*51 (mm) | ||
| + | *Rough Weight(Package containing): 206(g) | ||
| + | *Power Dissipation: 0.34A*5V | ||
| − | == <font color="blue"> | + | == <font color="blue">Hardware Description</font> == |
| + | [[file:MPI5008-006.jpg|300px]][[file:MPI5008-02.png|300px]]<br /> | ||
| + | ① USB interface:Get 5V Power from USB, If ④-13*2 Pin Socket has been connected, that this USB interface can be No Connect <br /> | ||
| + | ② HDMI interface:For HDMI transmission <br /> | ||
| + | ③ Backlight Power switch:Controls the backlight turned on and off to save power <br /> | ||
| + | ④ 13*2 Pin Socket:Get 5V Power from raspberry Pi to LCD, at the same time transfer touch signal back to raspberry Pi <br /> | ||
| + | ⑤ Extended interface:extended The ④-13*2 Pin Socket signal Pin-to-Pin <br /> | ||
| + | == <font color="blue">How to use with Raspbian/Ubuntu Mate/Win10 IoT Core System</font> == | ||
| − | * ''' | + | *'''Step 1, Install Raspbian official image''' |
| − | # | + | # Download the latest image from the official download. |
| − | # | + | # Install the system according to the official tutorial steps. |
| − | * ''' | + | *'''Step 2, Install LCD Driver Online''' |
| − | + | :Use SSH to connect the raspberry pi, | |
| − | + | :And Ensure that the raspberry pi is connected to the Internet before executing the following commands: | |
| − | |||
{{code|1= | {{code|1= | ||
| + | sudo rm -rf LCD-show | ||
git clone https://github.com/goodtft/LCD-show.git | git clone https://github.com/goodtft/LCD-show.git | ||
chmod -R 755 LCD-show | chmod -R 755 LCD-show | ||
| Line 58: | Line 62: | ||
sudo ./LCD5-show }} | sudo ./LCD5-show }} | ||
| − | + | == <font color="blue">How to use as PC monitor</font> == | |
| − | |||
| − | |||
| − | |||
| − | |||
| − | |||
| − | |||
| − | |||
| − | |||
| − | |||
| − | |||
| − | * ' | + | * Connect the computer HDMI output signal to the LCD HDMI interface by using the HDMI cable |
| + | * Connect the LCD's USB Touch interface (Either of the two MicroUSB) to the USB port of the device | ||
| + | * If there are several monitors, please unplug other monitor connectors first, and use LCD as the only monitor for testing. | ||
| − | + | {{rotate}} | |
| − | |||
| − | + | == <font color="blue">Driver download</font> == | |
| − | |||
| − | |||
| − | |||
| + | *'''Docment''' | ||
| − | + | # [http://www.lcdwiki.com/res/MPI5008/5inch_HDMI_Display_User_Manual(EN).pdf 5inch_HDMI_Display_User_Manual(EN)] | |
| + | # [http://www.lcdwiki.com/res/PublicFile/How_to_install_the_LCD_driver_V1.2.pdf How_to_install_the_LCD_driver_V1.2] | ||
| + | # [http://www.lcdwiki.com/res/PublicFile/How_to_install_matchbox-keyboard(En).pdf How_to_install_matchbox-keyboard] | ||
| + | # [http://www.lcdwiki.com/res/Show_Direction_and_Touch/How_to_calibrate_the_resistance_touch_screen-V1.2.pdf How_to_calibrate_the_resistance_touch_screen-V1.2] | ||
| + | # [http://www.lcdwiki.com/res/PublicFile/How_to_use_Raspberry_Pi(Download,Format,Burn,SSH,PuTTy)-V1.0.pdf How_to_use_Raspberry_Pi(Download,Format,Burn,SSH,PuTTy)-V1.0.pdf] | ||
| + | # [http://www.lcdwiki.com/res/Show_Direction_and_Touch/How_to_change_display_direction-HDMI-Resistive_Touch-V1.2.pdf How_to_change_display_direction-GPIO-Resistive_Touch-V1.2] | ||
| + | # <font color="blue">Product Dimensions:</font>[http://www.lcdwiki.com/res/MPI5008/MPI5008_Product_Dimensions.png MPI5008_Product_Dimensions] | ||
| − | * | + | *'''Driver download''' |
| − | + | #Local download: [http://www.lcdwiki.com/res/RaspDriver/LCD-show.tar.gz LCD-show.tar.gz] | |
| − | * | + | *'''Images download''' |
| − | |||
| − | |||
| − | + | :If you have difficulty installing the driver, or if you still can't use the display properly after installing the driver, | |
| − | + | :Please Try our Configned images for tested. | |
| − | |||
| − | + | :Just need download and write the image into the TF card. DO NOT need any driver installation steps. | |
| − | |||
| − | + | {| class="wikitable" border="1" style="width: 100%; margin-left:1.5%;background-color: white;" | |
| + | !Image Name | ||
| + | !Version | ||
| + | !Support | ||
| + | !Password | ||
| + | ! colspan="2" |Download | ||
| + | |- | ||
| + | | rowspan="2" |Raspbian | ||
| + | | rowspan="2" |2023-12-05 | ||
| + | | rowspan="2" |PI5/PI4/PI3B+/PI3/ | ||
| + | PI2/PI1/ZERO/ZERO W | ||
| + | | rowspan="2" |user:pi | ||
| + | password:raspberry | ||
| + | |[[File:Baiduyun.jpg|24px]]BaiduYun: | ||
| + | |[https://pan.baidu.com/s/1Cu9G2ichpjbmy16eRSWABg MPI5008-5inch-A-2023-12-05-raspios-bookworm-armhf.7z] 提取码:sgbv | ||
| + | |- | ||
| + | |[[File:Mega-1.jpg|24px]]Mega: | ||
| + | |[https://mega.nz/folder/7lhRwZiA#_KJRb3IsYNVXKH_HK-jlGQ MPI5008-5inch-A-2021-10-30-raspios-buster-armhf.7z] | ||
| + | |- | ||
| + | | rowspan="2" |Ubuntu-MATE-32bit | ||
| + | | rowspan="2" |22.04 | ||
| + | | rowspan="2" |PI4,PI3,PI2 | ||
| + | | rowspan="2" |user:pi | ||
| + | password:raspberry | ||
| + | |[[File:Baiduyun.jpg|24px]]BaiduYun: | ||
| + | |[https://pan.baidu.com/s/1_xcgzb0EYXyG2o80l5fXPw MPI5008-5inch-A-ubuntu-mate-22.04-desktop-armhf+raspi.7z] 提取码:u7q3 | ||
| + | |- | ||
| + | |[[File:Mega-1.jpg|24px]]Mega: | ||
| + | |[https://mega.nz/folder/31wRzAiZ#y6N0D7fRYCe-Xh1zhhSKjA MPI5008-5inch-A-ubuntu-mate-20.1-desktop-armhf+raspi.7z] | ||
| + | |- | ||
| + | | rowspan="2" |Kali Linux RaspberryPi-32bit | ||
| + | | rowspan="2" |2023.1 | ||
| + | | rowspan="2" |PI4B,PI3B+,PI3,PI2 | ||
| + | | rowspan="2" |user: kali | ||
| + | password: kali | ||
| + | |[[File:Baiduyun.jpg|24px]]BaiduYun: | ||
| + | |[https://pan.baidu.com/s/13MerdAyDH0HeX36JbAV8BA MPI5008-5inch-A-kali-linux-2023.1] 提取码:psmp | ||
| + | |- | ||
| + | |[[File:Mega-1.jpg|24px]]Mega: | ||
| + | |[https://mega.nz/folder/S1IT2CZZ#q0x_y5XR8a-NqhIzzU4Wkg MPI5008-5inch-A-kali-linux-2021.2] | ||
| + | |} | ||
| − | * | + | *[http://www.lcdwiki.com/MD5 MD5 of Image] |
| − | |||
| − | == <font color="blue"> | + | == <font color="blue">Software</font> == |
*[http://www.lcdwiki.com/res/software/Panasonic_SDFormatter.zip Panasonic SDFormatter] | *[http://www.lcdwiki.com/res/software/Panasonic_SDFormatter.zip Panasonic SDFormatter] | ||
| Line 110: | Line 144: | ||
*[http://www.lcdwiki.com/res/software/putty.zip PuTTY] | *[http://www.lcdwiki.com/res/software/putty.zip PuTTY] | ||
| − | + | [[#top|<font color="red">BACK TO TOP</font>]] | |
| − | |||
| − | |||
| − | |||
| − | |||
| − | |||
| − | |||
| − | |||
| − | |||
| − | |||
| − | |||
| − | |||
| − | |||
| − | |||
| − | |||
| − | |||
| − | |||
| − | |||
| − | |||
| − | |||
| − | |||
| − | |||
| − | |||
| − | |||
| − | |||
| − | |||
| − | |||
| − | |||
| − | |||
| − | |||
| − | |||
| − | |||
| − | |||
| − | |||
| − | |||
| − | |||
| − | |||
| − | |||
| − | |||
| − | |||
| − | |||
| − | |||
| − | |||
| − | |||
| − | |||
| − | |||
| − | |||
| − | |||
| − | |||
| − | |||
| − | |||
| − | |||
| − | |||
| − | |||
| − | |||
| − | |||
| − | |||
| − | |||
| − | |||
| − | |||
| − | |||
| − | |||
| − | |||
| − | |||
| − | |||
| − | |||
| − | |||
| − | |||
| − | |||
| − | |||
| − | |||
| − | |||
| − | |||
| − | |||
| − | |||
| − | |||
| − | |||
| − | |||
| − | |||
| − | |||
| − | |||
| − | |||
| − | |||
| − | |||
| − | |||
| − | |||
| − | |||
| − | |||
| − | |||
| − | |||
| − | |||
| − | |||
| − | |||
| − | |||
| − | |||
| − | |||
| − | |||
| − | |||
| − | |||
| − | |||
| − | |||
| − | |||
| − | |||
| − | |||
| − | |||
| − | |||
| − | |||
| − | |||
| − | |||
| − | |||
| − | |||
| − | |||
| − | |||
| − | |||
| − | |||
| − | |||
| − | |||
| − | |||
| − | |||
| − | |||
| − | |||
| − | |||
| − | |||
| − | |||
| − | |||
| − | |||
| − | |||
| − | |||
| − | |||
| − | |||
| − | |||
| − | |||
| − | |||
| − | |||
| − | |||
| − | |||
| − | |||
| − | |||
| − | |||
| − | |||
| − | |||
| − | |||
| − | |||
| − | |||
| − | |||
| − | |||
| − | |||
| − | |||
| − | |||
| − | |||
| − | |||
| − | |||
| − | |||
| − | |||
| − | |||
| − | |||
| − | |||
| − | |||
| − | |||
| − | |||
| − | |||
| − | |||
| − | |||
| − | |||
| − | |||
| − | |||
| − | |||
| − | |||
| − | |||
| − | |||
| − | |||
| − | |||
| − | |||
| − | |||
| − | |||
| − | |||
| − | |||
| − | |||
| − | |||
| − | |||
| − | |||
| − | |||
| − | |||
| − | |||
| − | |||
| − | |||
| − | |||
| − | |||
| − | |||
| − | |||
| − | |||
| − | |||
| − | |||
| − | |||
| − | |||
| − | |||
| − | |||
| − | |||
| − | |||
| − | |||
| − | |||
| − | |||
| − | |||
| − | |||
| − | |||
| − | |||
| − | |||
| − | |||
| − | |||
| − | |||
| − | |||
| − | |||
| − | |||
| − | |||
| − | |||
| − | |||
| − | |||
| − | |||
| − | |||
| − | |||
| − | |||
| − | |||
| − | |||
| − | |||
| − | |||
| − | |||
| − | |||
| − | |||
| − | |||
| − | |||
| − | |||
| − | |||
| − | |||
| − | |||
| − | |||
| − | |||
| − | |||
| − | |||
| − | |||
| − | |||
| − | |||
Revision as of 14:08, 27 January 2024
Contents
Product Video
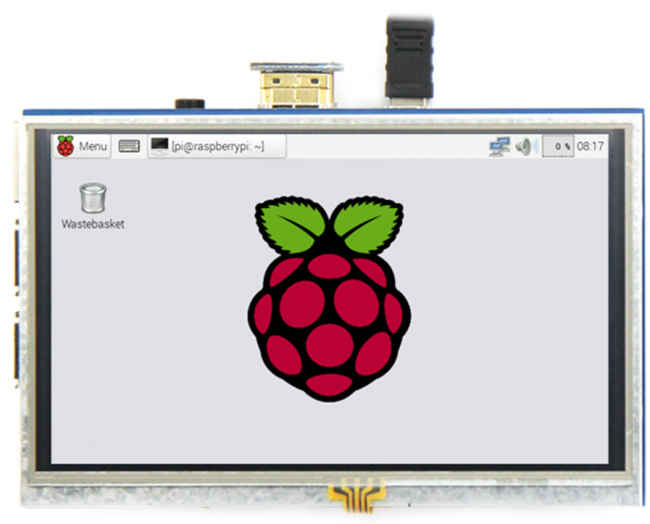
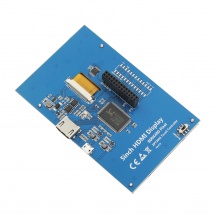
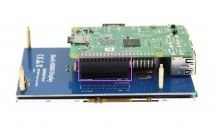
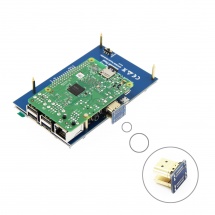
Product pictures
Product description
- 5inch standard display, 800 × 480 resolution
- With resistive touch screen, support touch control
- support backlight control alone, the backlight can be turned off to save power
- supports standard HDMI interface input, compatible with and can be directly inserted with Raspberry Pi (3rd, 2nd, and 1st generation)
- can be used as general-purpose-use HDMI monitor, for example: connect with a computer HDMI as the sub-display (resolution need to be able to force output for 800 x480)
- used as a raspberry pie display that supports Raspbian, Ubuntu, kali, Kodi(no touch), win10 IOT(no touch)
- work as a PC monitor, support XP,win7, win8, win10 system(do not support touch)
- CE, RoHS certification
Product Parameters
- Size: 5.0(inch)
- SKU: MPI5008
- Resolution: 800*480(dots)
- Touch: 4-wire resistive touch
- Product Size: 121.11*77.93(mm)
- Package Size: 154*135*51 (mm)
- Rough Weight(Package containing): 206(g)
- Power Dissipation: 0.34A*5V
Hardware Description
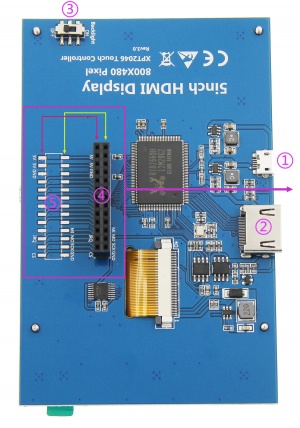
① USB interface:Get 5V Power from USB, If ④-13*2 Pin Socket has been connected, that this USB interface can be No Connect
② HDMI interface:For HDMI transmission
③ Backlight Power switch:Controls the backlight turned on and off to save power
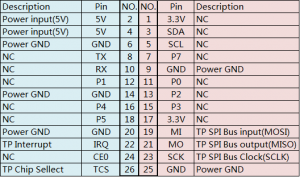
④ 13*2 Pin Socket:Get 5V Power from raspberry Pi to LCD, at the same time transfer touch signal back to raspberry Pi
⑤ Extended interface:extended The ④-13*2 Pin Socket signal Pin-to-Pin
How to use with Raspbian/Ubuntu Mate/Win10 IoT Core System
- Step 1, Install Raspbian official image
- Download the latest image from the official download.
- Install the system according to the official tutorial steps.
- Step 2, Install LCD Driver Online
- Use SSH to connect the raspberry pi,
- And Ensure that the raspberry pi is connected to the Internet before executing the following commands:
sudo rm -rf LCD-show
git clone https://github.com/goodtft/LCD-show.git
chmod -R 755 LCD-show
cd LCD-show/
sudo ./LCD5-show
How to use as PC monitor
- Connect the computer HDMI output signal to the LCD HDMI interface by using the HDMI cable
- Connect the LCD's USB Touch interface (Either of the two MicroUSB) to the USB port of the device
- If there are several monitors, please unplug other monitor connectors first, and use LCD as the only monitor for testing.
How to rotate the display direction
This method only applies to the Raspberry Pi series of display screens, other display screens do not apply.
- Method 1,If the driver is not installed, execute the following command (Raspberry Pi needs to connected to the Internet):
sudo rm -rf LCD-show
git clone https://github.com/goodtft/LCD-show.git
chmod -R 755 LCD-show
cd LCD-show/
sudo ./XXX-show 90
After execution, the driver will be installed. The system will automatically restart, and the display screen will rotate 90 degrees to display and touch normally.
( ' XXX-show ' can be changed to the corresponding driver, and ' 90 ' can be changed to 0, 90, 180 and 270, respectively representing rotation angles of 0 degrees, 90 degrees, 180 degrees, 270 degrees)
- Method 2,If the driver is already installed, execute the following command:
cd LCD-show/
sudo ./rotate.sh 90
After execution, the system will automatically restart, and the display screen will rotate 90 degrees to display and touch normally.
( ' 90 ' can be changed to 0, 90, 180 and 270, respectively representing rotation angles of 0 degrees, 90 degrees, 180 degrees, 270 degrees)
If the rotate.sh prompt cannot be found, use Method 1 to install the latest drivers
Driver download
- Docment
- 5inch_HDMI_Display_User_Manual(EN)
- How_to_install_the_LCD_driver_V1.2
- How_to_install_matchbox-keyboard
- How_to_calibrate_the_resistance_touch_screen-V1.2
- How_to_use_Raspberry_Pi(Download,Format,Burn,SSH,PuTTy)-V1.0.pdf
- How_to_change_display_direction-GPIO-Resistive_Touch-V1.2
- Product Dimensions:MPI5008_Product_Dimensions
- Driver download
- Local download: LCD-show.tar.gz
- Images download
- If you have difficulty installing the driver, or if you still can't use the display properly after installing the driver,
- Please Try our Configned images for tested.
- Just need download and write the image into the TF card. DO NOT need any driver installation steps.
| Image Name | Version | Support | Password | Download | |
|---|---|---|---|---|---|
| Raspbian | 2023-12-05 | PI5/PI4/PI3B+/PI3/
PI2/PI1/ZERO/ZERO W |
user:pi
password:raspberry |
MPI5008-5inch-A-2023-12-05-raspios-bookworm-armhf.7z 提取码:sgbv | |
| MPI5008-5inch-A-2021-10-30-raspios-buster-armhf.7z | |||||
| Ubuntu-MATE-32bit | 22.04 | PI4,PI3,PI2 | user:pi
password:raspberry |
MPI5008-5inch-A-ubuntu-mate-22.04-desktop-armhf+raspi.7z 提取码:u7q3 | |
| MPI5008-5inch-A-ubuntu-mate-20.1-desktop-armhf+raspi.7z | |||||
| Kali Linux RaspberryPi-32bit | 2023.1 | PI4B,PI3B+,PI3,PI2 | user: kali
password: kali |
MPI5008-5inch-A-kali-linux-2023.1 提取码:psmp | |
| MPI5008-5inch-A-kali-linux-2021.2 | |||||
