Hardware Description
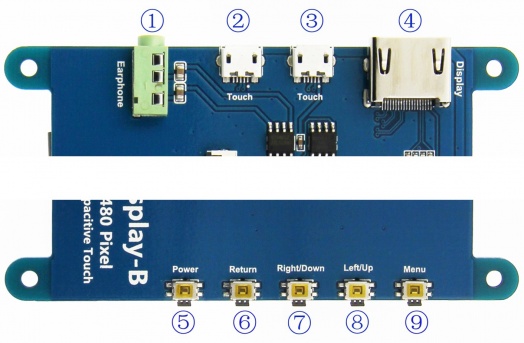
① Earphone: 3.5mm Audio output interface
②&③ Touch: USB connector ( For power supply and touch output, the functions of the both are the same, can just use one of them)
④ Display: HDMI interface ( For connecting motherboard and LCD monitor)
⑤ Power: Controls the backlight turned on and off to save power
⑥ Return: Return (Only valid in the OSD Settings menu)
⑦ Right/Down: Direction Right/Down (Backlight shortcut key)
⑧ Left/Up: Direction Left/Up (Backlight shortcut key)
⑨ Menu: Open the OSD / Select key (Only valid in the OSD Settings menu)
How to use with Raspbian/Ubuntu Mate/Win10 IoT Core System
Step 1, Install Raspbian official image
- Download the latest image from the official download.
- Install the system according to the official tutorial steps.
Step 2, modify the “config.txt”
After the programming of Step1 is completed, open the config.txt file of TF card root directory and
add the following code at the end of the file, save and eject Micro SD Card safely:
max_usb_current=1
hdmi_force_hotplug=1
config_hdmi_boost=7
hdmi_group=2
hdmi_mode=1
hdmi_mode=87
hdmi_drive=1
hdmi_cvt 800 480 60 6 0 0 0
Step 3
Insert the TF Card to Raspberry Pi, connect the Raspberry Pi and LCD by HDMI cable; connect USB cable to one of the four USB ports of Raspberry Pi, and connect the other end of the USB cable to the USB port of the LCD; then supply power to Raspberry Pi; after that if the display and touch both are OK, it means drive successfully (please use the full 2A for power supply).
How to rotate display direction
- Add the statement in the “config.txt” file (the “config.txt” file is located in /boot):
sudo nano /boot/config.txt
- Add the statement in the “config.txt” file, press Ctrl+X to exit, press Y to save.
display_rotate=1 #0: 0; 1: 90; 2: 180; 3: 270
- Restart the Raspberry Pi after saving.
sudo reboot
How to rotate Touch direction
After the display is rotated, the touch needs to be modified.
- Install libinput
sudo apt-get install xserver-xorg-input-libinput
- Create the xorg.conf. D directory in /etc/x11 / below (if the directory already exists, this will proceed directly to step 3)
sudo mkdir /etc/X11/xorg.conf.d
- Copy the file “40-libinput.conf” to the directory you just created.
sudo cp /usr/share/X11/xorg.conf.d/40-libinput.conf /etc/X11/xorg.conf.d/
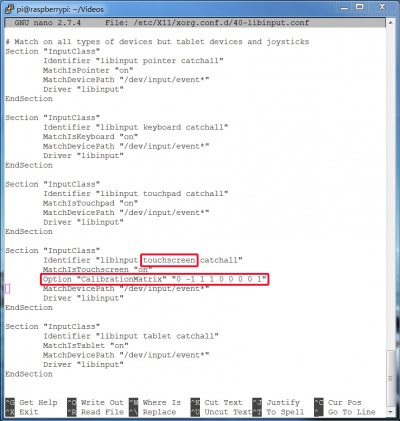
- Edit “/etc/X11/xorg.conf.d/40-libinput.conf”
sudo nano /etc/X11/xorg.conf.d/40-libinput.conf
- Find a part of the touchscreen, add the following statement inside, press Ctrl+X to exit, press Y to save.
Option "CalibrationMatrix" "0 1 0 -1 0 1 0 0 1"
Eg:
- Restar your Raspberry Pi
sudo reboot
Complete the above steps for a 90 degree rotation.
Note:
- 0 degrees of rotation parameters: Option "CalibrationMatrix" "1 0 0 0 1 0 0 0 1"
- 90 degrees of rotation parameters: Option "CalibrationMatrix" "0 1 0 0-1 1 0 0 1"
- 180 degrees of rotation parameters: Option "CalibrationMatrix" "-1 0 1 0 -1 1 0 0 1"
- 270 degrees of rotation parameters: Option "CalibrationMatrix" "0-1 1 1 0 0 0 0 1"
How to use as PC monitor
- connect the computer HDMI output signal to the LCD HDMI interface by using the HDMI cable
- Connect the LCD's USB Touch interface (Either of the two MicroUSB) to the USB port of the device
- If there are several monitors, please unplug other monitor connectors first, and use LCD as the only monitor for testing.