“如何安装LCD驱动(CN)”的版本间的差异
来自LCD wiki
(创建页面,内容为“123”) |
|||
| 第1行: | 第1行: | ||
| − | + | {| class="wikitable" border="1" style=" background-color: white;" | |
| + | |- style="background-color: #f2f2f2;text-align:center" | ||
| + | | style="color: #ff0000; font-weight:bold;" align="center" |语言选择(Language): | ||
| + | | style=" font-weight:bold;" align="center" |[http://www.lcdwiki.com/zh/%E5%A6%82%E4%BD%95%E5%AE%89%E8%A3%85%E8%99%9A%E6%8B%9F%E9%94%AE%E7%9B%98(CN) 中文] | ||
| + | | style=" font-weight:bold;" align="center" |[http://www.lcdwiki.com/How_to_install_Soft_Keyboard EN] | ||
| + | |} | ||
| + | == <font color="blue">'''如何安装虚拟键盘'''</font> == | ||
| + | |||
| + | 本安装教程使用”2016-05-27-raspbian-jessie”版本进行测试,如使用wheezy或更早版本镜像,则第5、6步所述文件路径有差异,具体请参考virtual-keyboard官方安装教程。 | ||
| + | |||
| + | '''官方参考地址(英文)''' http://ozzmaker.com/virtual-keyboard-for-the-raspberry-pi/ | ||
| + | |||
| + | 1、 安装必需文件 | ||
| + | <pre style="border: 1px dashed black;color:black;> | ||
| + | sudo apt-get update | ||
| + | sudo apt-get install libfakekey-dev libpng-dev libxft-dev autoconf libtool | ||
| + | </pre> | ||
| + | |||
| + | 2、安装编译虚拟键盘matchbox-keyboard | ||
| + | <pre style="border: 1px dashed black;color:black;> | ||
| + | git clone https://github.com/mwilliams03/matchbox-keyboard.git | ||
| + | cd matchbox-keyboard | ||
| + | ./autogen.sh | ||
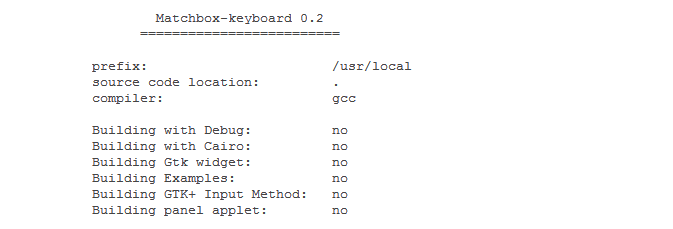
| + | </pre>(注意:” ./autogen.sh”执行时间较长约几分钟,正确执行后显示界面如下,如执行完不出现类似以下界面则需检查是否有error提示项) | ||
| + | |||
| + | [[File:Soft_Keyboard-01.png]] | ||
| + | |||
| + | 接着执行: | ||
| + | <pre style="border: 1px dashed black;color:black;width: 50%"> | ||
| + | sudo make | ||
| + | sudo make install | ||
| + | </pre> | ||
| + | 3、安装虚拟键盘所用的共享库 | ||
| + | <pre style="border: 1px dashed black;color:black;width: 50%"> | ||
| + | sudo apt-get install libmatchbox1 </pre> | ||
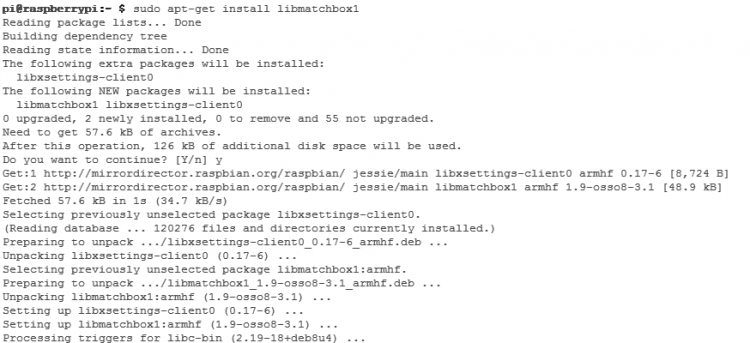
| + | 如下图: | ||
| + | |||
| + | [[File:Soft_Keyboard-02.png|750px]] | ||
| + | |||
| + | 4、创建虚拟键盘启动脚本 | ||
| + | <pre style="border: 1px dashed black;color:black;width: 50%"> | ||
| + | sudo nano /usr/bin/toggle-matchbox-keyboard.sh </pre> | ||
| + | 粘贴以下内容并按'''Ctrl + X和Y'''保存退出 | ||
| + | <pre style="border: 1px dashed black;color:black;width: 50%"> | ||
| + | #!/bin/bash | ||
| + | #This script toggle the virtual keyboard | ||
| + | PID=`pidof matchbox-keyboard` | ||
| + | if [ ! -e $PID ]; then | ||
| + | killall matchbox-keyboard | ||
| + | else | ||
| + | matchbox-keyboard -s 50 extended& | ||
| + | fi | ||
| + | </pre> | ||
| + | 给以上脚本增加可执行权限 | ||
| + | <pre style="border: 1px dashed black;color:black;width: 50%"> | ||
| + | sudo chmod +x /usr/bin/toggle-matchbox-keyboard.sh </pre> | ||
| + | 5、把以上脚本增加到开始菜单 | ||
| + | <pre style="border: 1px dashed black;color:black;> | ||
| + | sudo nano /usr/share/applications/toggle-matchbox-keyboard.desktop | ||
| + | </pre> | ||
| + | 粘贴以下内容并按'''Ctrl+X'''和'''Y'''保存退出 | ||
| + | <pre style="border: 1px dashed black;color:black;width: 50%"> | ||
| + | [Desktop Entry] | ||
| + | Name=Toggle Matchbox Keyboard | ||
| + | Comment=Toggle Matchbox Keyboard | ||
| + | Exec=toggle-matchbox-keyboard.sh | ||
| + | Type=Application | ||
| + | Icon=matchbox-keyboard.png | ||
| + | Categories=Panel;Utility;MB | ||
| + | X-MB-INPUT-MECHANSIM=True </pre> | ||
| + | 6、在任务栏上创建图标(注意该步骤必须使用"pi"用户权限,如果使用管理员权限,将找不到该文件) | ||
| + | <pre style="border: 1px dashed black;color:black"> | ||
| + | nano ~/.config/lxpanel/LXDE-pi/panels/panel </pre> | ||
| + | 7、找到类似以下命令(树莓派版本不同可能默认内容有差异) | ||
| + | <pre style="border: 1px dashed black;color:black;"> | ||
| + | Plugin { | ||
| + | type=launchbar | ||
| + | Config { | ||
| + | Button { | ||
| + | id=/usr/share/applications/lxde-x-www-browser.desktop | ||
| + | } | ||
| + | Button { | ||
| + | id=/usr/share/raspi-ui-overrides/applications/pcmanfm.desktop | ||
| + | } | ||
| + | Button { | ||
| + | id=/usr/share/raspi-ui-overrides/applications/lxterminal.desktop | ||
| + | } | ||
| + | Button { | ||
| + | id=/usr/share/applications/wolfram-mathematica.desktop | ||
| + | } | ||
| + | Button { | ||
| + | id=/usr/share/applications/wolfram-language.desktop | ||
| + | } | ||
| + | } | ||
| + | } </pre> | ||
| + | 添加以下代码增加一个图标项 | ||
| + | <pre style="border: 1px dashed black;color:black;"> | ||
| + | Button { | ||
| + | id=toggle-matchbox-keyboard.desktop | ||
| + | } </pre> | ||
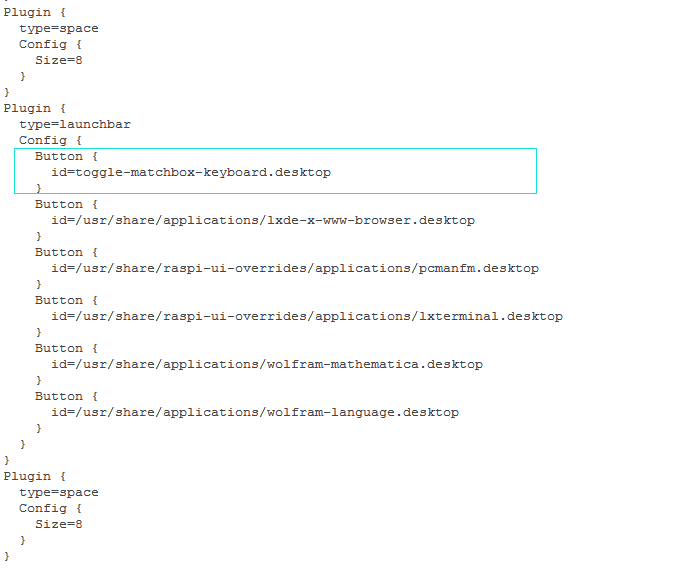
| + | 修改完效果如下图所示: | ||
| + | |||
| + | [[File:Soft_Keyboard-03.png|750px]] | ||
| + | |||
| + | 8、修改完后执行以下命令重启系统,正常可看到屏幕任务栏处多出了一个虚拟键盘图标 | ||
| + | {{code|1=sudo reboot }} | ||
| + | P.S. 通过SSH登陆如何改变虚拟键盘大小 | ||
| + | {{code|1=DISPLAY=:0.0 matchbox-keyboard -s 50 extended | ||
| + | DISPLAY=:0.0 matchbox-keyboard -s 100 extended | ||
| + | }} | ||
2018年5月19日 (六) 17:17的版本
| 语言选择(Language): | 中文 | EN |
如何安装虚拟键盘
本安装教程使用”2016-05-27-raspbian-jessie”版本进行测试,如使用wheezy或更早版本镜像,则第5、6步所述文件路径有差异,具体请参考virtual-keyboard官方安装教程。
官方参考地址(英文) http://ozzmaker.com/virtual-keyboard-for-the-raspberry-pi/
1、 安装必需文件
sudo apt-get update
sudo apt-get install libfakekey-dev libpng-dev libxft-dev autoconf libtool
2、安装编译虚拟键盘matchbox-keyboard
git clone https://github.com/mwilliams03/matchbox-keyboard.git
cd matchbox-keyboard
./autogen.sh
(注意:” ./autogen.sh”执行时间较长约几分钟,正确执行后显示界面如下,如执行完不出现类似以下界面则需检查是否有error提示项)
接着执行:
sudo make
sudo make install
3、安装虚拟键盘所用的共享库
sudo apt-get install libmatchbox1
如下图:
4、创建虚拟键盘启动脚本
sudo nano /usr/bin/toggle-matchbox-keyboard.sh
粘贴以下内容并按Ctrl + X和Y保存退出
#!/bin/bash
#This script toggle the virtual keyboard
PID=`pidof matchbox-keyboard`
if [ ! -e $PID ]; then
killall matchbox-keyboard
else
matchbox-keyboard -s 50 extended&
fi
给以上脚本增加可执行权限
sudo chmod +x /usr/bin/toggle-matchbox-keyboard.sh
5、把以上脚本增加到开始菜单
sudo nano /usr/share/applications/toggle-matchbox-keyboard.desktop
粘贴以下内容并按Ctrl+X和Y保存退出
[Desktop Entry]
Name=Toggle Matchbox Keyboard
Comment=Toggle Matchbox Keyboard
Exec=toggle-matchbox-keyboard.sh
Type=Application
Icon=matchbox-keyboard.png
Categories=Panel;Utility;MB
X-MB-INPUT-MECHANSIM=True
6、在任务栏上创建图标(注意该步骤必须使用"pi"用户权限,如果使用管理员权限,将找不到该文件)
nano ~/.config/lxpanel/LXDE-pi/panels/panel
7、找到类似以下命令(树莓派版本不同可能默认内容有差异)
Plugin {
type=launchbar
Config {
    Button {
      id=/usr/share/applications/lxde-x-www-browser.desktop
    }
    Button {
      id=/usr/share/raspi-ui-overrides/applications/pcmanfm.desktop
    }
    Button {
      id=/usr/share/raspi-ui-overrides/applications/lxterminal.desktop
    }
    Button {
      id=/usr/share/applications/wolfram-mathematica.desktop
    }
    Button {
      id=/usr/share/applications/wolfram-language.desktop
    }
  }
}
添加以下代码增加一个图标项
  Button {
id=toggle-matchbox-keyboard.desktop
        }
修改完效果如下图所示:
8、修改完后执行以下命令重启系统,正常可看到屏幕任务栏处多出了一个虚拟键盘图标
sudo reboot
P.S. 通过SSH登陆如何改变虚拟键盘大小
DISPLAY=:0.0 matchbox-keyboard -s 50 extended
DISPLAY=:0.0 matchbox-keyboard -s 100 extended


