Difference between revisions of "How to install Soft Keyboard"
(Tag: Visual edit) |
|||
| Line 1: | Line 1: | ||
| − | How to install Soft Keyboard | + | == <big>How to install Soft Keyboard</big> == |
| − | + | <big>This installation tutorial uses "2016-05-27-raspbian-jessie" version for testing. If use wheezy or earlier image, then the step5 and step6 have different file paths, please refer to the virtual-keyboard official installation tutorial for specification. | |
| − | This installation tutorial uses "2016-05-27-raspbian-jessie" version for testing. If use wheezy or earlier image, then the step5 and step6 have different file paths, please refer to the virtual-keyboard official installation tutorial for specification. | ||
Official reference address (English) | Official reference address (English) | ||
| − | http://ozzmaker.com/virtual-keyboard-for-the-raspberry-pi/ | + | http://ozzmaker.com/virtual-keyboard-for-the-raspberry-pi/</big> |
| − | 1. Install the necessary files | + | <big>1. Install the necessary files |
sudo apt-get update | sudo apt-get update | ||
| − | sudo apt-get install libfakekey-dev libpng-dev libxft-dev autoconf libtool <br> | + | sudo apt-get install libfakekey-dev libpng-dev libxft-dev autoconf libtool <br>2. Install the matchbox-keyboard |
| − | 2. Install the matchbox-keyboard | + | git clone https://github.com/mwilliams03/matchbox-keyboard.git</big> |
| − | git clone https://github.com/mwilliams03/matchbox-keyboard.git | + | |
| − | cd matchbox-keyboard | + | <big>cd matchbox-keyboard</big> |
| − | ./autogen.sh | + | |
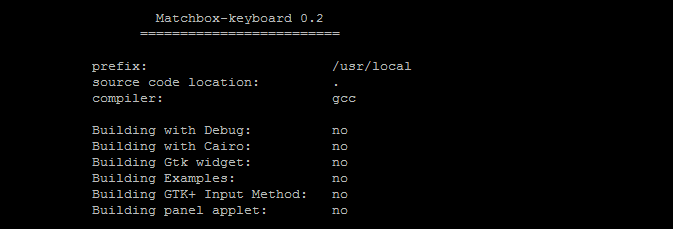
| − | (Note: "./ autogen.sh" execution takes a few minutes, and would show as follows after running correctly; if it doesn’t show as follows, then need to check to see if there are error Popup Window prompt) | + | <big>./autogen.sh</big> |
| − | [[File:Soft_Keyboard-01.png|750px]] | + | <big>(Note: "./ autogen.sh" execution takes a few minutes, and would show as follows after running correctly; if it doesn’t show as follows, then need to check to see if there are error Popup Window prompt) |
| − | Continue: | + | [[File:Soft_Keyboard-01.png|750px]]</big> |
| + | <big>Continue: | ||
sudo make | sudo make | ||
| − | sudo make install | + | sudo make install</big> |
| − | + | <big><br />3. Install the shared data library for matchbox-keyboard | |
| − | 3. Install the shared data library for matchbox-keyboard | ||
sudo apt-get install libmatchbox1 | sudo apt-get install libmatchbox1 | ||
| − | As following: | + | As following:</big> |
| − | [[File:Soft_Keyboard-02.png|750px]] | + | <big>[[File:Soft_Keyboard-02.png|750px]]</big> |
| − | 4. Create a virtual keyboard startup script | + | <big>4. Create a virtual keyboard startup script |
| − | sudo nano /usr/bin/toggle-matchbox-keyboard.sh | + | sudo nano /usr/bin/toggle-matchbox-keyboard.sh</big> |
| − | Paste the following, press Ctrl + X and Y, to save then exit | + | <big>Paste the following, press Ctrl + X and Y, to save then exit</big> |
| − | + | <big>!/bin/bash</big><big>This script toggle the virtual keyboard</big> | |
| − | |||
| − | PID=`pidof matchbox-keyboard` | + | <big>PID=`pidof matchbox-keyboard` |
if [ ! -e $PID ]; then | if [ ! -e $PID ]; then | ||
killall matchbox-keyboard | killall matchbox-keyboard | ||
else | else | ||
matchbox-keyboard -s 50 extended& | matchbox-keyboard -s 50 extended& | ||
| − | fi | + | fi</big> |
| − | Add executable permission for the script above | + | <big>Add executable permission for the script above |
| − | sudo chmod +x /usr/bin/toggle-matchbox-keyboard.sh | + | sudo chmod +x /usr/bin/toggle-matchbox-keyboard.sh</big> |
| + | <big><br />5. Add script above to Start menu | ||
| + | sudo nano /usr/share/applications/toggle-matchbox-keyboard.desktop</big> | ||
| − | + | <big>Paste the following content, press Ctrl + X and Y, to save then exit | |
| − | |||
| − | |||
| − | Paste the following content, press Ctrl + X and Y, to save then exit | ||
[Desktop Entry] | [Desktop Entry] | ||
Name=Toggle Matchbox Keyboard | Name=Toggle Matchbox Keyboard | ||
| Line 55: | Line 52: | ||
Icon=matchbox-keyboard.png | Icon=matchbox-keyboard.png | ||
Categories=Panel;Utility;MB | Categories=Panel;Utility;MB | ||
| − | X-MB-INPUT-MECHANSIM=True | + | X-MB-INPUT-MECHANSIM=True</big> |
| − | |||
| − | |||
| − | 7. Find the resembles similar to the following command (default content may be different in different Raspberry Pi versions) | + | <big>6. Create an icon on the taskbar (Note that in this step, must be "pi" user privileges, if you use administrator privileges, will not find the file) |
| + | nano ~/.config/lxpanel/LXDE-pi/panels/panel</big> | ||
| + | |||
| + | <big>7. Find the resembles similar to the following command (default content may be different in different Raspberry Pi versions) | ||
Plugin { | Plugin { | ||
type=launchbar | type=launchbar | ||
| − | Config { | + | Config {</big> |
| − | Button { | + | <big>Button { |
id=/usr/share/applications/lxde-x-www-browser.desktop | id=/usr/share/applications/lxde-x-www-browser.desktop | ||
} | } | ||
| Line 78: | Line 76: | ||
id=/usr/share/applications/wolfram-language.desktop | id=/usr/share/applications/wolfram-language.desktop | ||
} | } | ||
| − | } | + | }</big> |
| − | } | + | <big>}</big> |
| + | |||
| + | <big>Add the following code to add an icon item</big> | ||
| + | <big>Button {</big> | ||
| + | <big>id=toggle-matchbox-keyboard.desktop</big> | ||
| + | <big>}</big> | ||
| + | <big>After modifying, would show as below:</big> | ||
| − | + | <big>[[File:Soft_Keyboard-03.png|750px]]</big> | |
| − | |||
| − | |||
| − | |||
| − | After modifying, | + | <big>8. After modifying, run the following command and re-start the system; you will see a virtual keyboard icon in taskbar on the screen normally. |
| − | + | sudo reboot</big> | |
| − | |||
| − | + | <big>P.S. Log into via SSH to see how to change the size of the virtual keyboard</big> | |
| − | |||
| − | + | <big>DISPLAY=:0.0 matchbox-keyboard -s 50 extended | |
| − | DISPLAY=:0.0 matchbox-keyboard -s 50 extended | + | DISPLAY=:0.0 matchbox-keyboard -s 100 extended</big> |
| − | DISPLAY=:0.0 matchbox-keyboard -s 100 extended | ||
Revision as of 11:36, 19 May 2018
How to install Soft Keyboard
This installation tutorial uses "2016-05-27-raspbian-jessie" version for testing. If use wheezy or earlier image, then the step5 and step6 have different file paths, please refer to the virtual-keyboard official installation tutorial for specification. Official reference address (English) http://ozzmaker.com/virtual-keyboard-for-the-raspberry-pi/
1. Install the necessary files
sudo apt-get update
sudo apt-get install libfakekey-dev libpng-dev libxft-dev autoconf libtool
2. Install the matchbox-keyboard
git clone https://github.com/mwilliams03/matchbox-keyboard.git
cd matchbox-keyboard
./autogen.sh
(Note: "./ autogen.sh" execution takes a few minutes, and would show as follows after running correctly; if it doesn’t show as follows, then need to check to see if there are error Popup Window prompt)

Continue: sudo make sudo make install
3. Install the shared data library for matchbox-keyboard
sudo apt-get install libmatchbox1
As following:

4. Create a virtual keyboard startup script sudo nano /usr/bin/toggle-matchbox-keyboard.sh
Paste the following, press Ctrl + X and Y, to save then exit
!/bin/bashThis script toggle the virtual keyboard
PID=`pidof matchbox-keyboard` if [ ! -e $PID ]; then killall matchbox-keyboard else matchbox-keyboard -s 50 extended& fi
Add executable permission for the script above sudo chmod +x /usr/bin/toggle-matchbox-keyboard.sh
5. Add script above to Start menu
sudo nano /usr/share/applications/toggle-matchbox-keyboard.desktop
Paste the following content, press Ctrl + X and Y, to save then exit [Desktop Entry] Name=Toggle Matchbox Keyboard Comment=Toggle Matchbox Keyboard Exec=toggle-matchbox-keyboard.sh Type=Application Icon=matchbox-keyboard.png Categories=Panel;Utility;MB X-MB-INPUT-MECHANSIM=True
6. Create an icon on the taskbar (Note that in this step, must be "pi" user privileges, if you use administrator privileges, will not find the file) nano ~/.config/lxpanel/LXDE-pi/panels/panel
7. Find the resembles similar to the following command (default content may be different in different Raspberry Pi versions) Plugin { type=launchbar Config {
   Button {
     id=/usr/share/applications/lxde-x-www-browser.desktop
   }
   Button {
     id=/usr/share/raspi-ui-overrides/applications/pcmanfm.desktop
   }
   Button {
     id=/usr/share/raspi-ui-overrides/applications/lxterminal.desktop
   }
   Button {
     id=/usr/share/applications/wolfram-mathematica.desktop
   }
   Button {
     id=/usr/share/applications/wolfram-language.desktop
   }
 }
}
Add the following code to add an icon item
Button {
id=toggle-matchbox-keyboard.desktop
}
After modifying, would show as below:

8. After modifying, run the following command and re-start the system; you will see a virtual keyboard icon in taskbar on the screen normally. sudo reboot
P.S. Log into via SSH to see how to change the size of the virtual keyboard
DISPLAY=:0.0 matchbox-keyboard -s 50 extended DISPLAY=:0.0 matchbox-keyboard -s 100 extended